


Vlad's Schmidfire
+2
Abhorsen
jamesv9820
6 posters
Page 1 of 1

Vlad's Schmidfire
![]() jamesv9820 Wed 24 Oct 2012, 06:32
jamesv9820 Wed 24 Oct 2012, 06:32
Thanks for all the saw reccomendation, lack of time meant i went to my LHS and bought an exacto - did the job fine.
So lets have a few pics of my butchery shall we? First a bit of a comparison
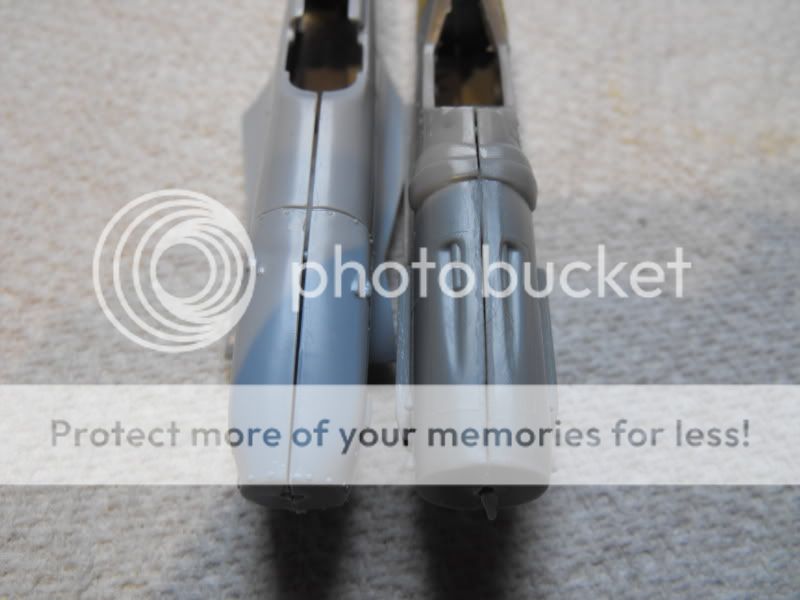
The more eagle eyed among you will notice that the 109 is a Gustav - first one i got my hands on - and not an Emil which has the cleaner shape.
 and now after a bit of sawing
 Hmmn...might need a bit more sawing......
....might have slightly overdone it with the sawing....

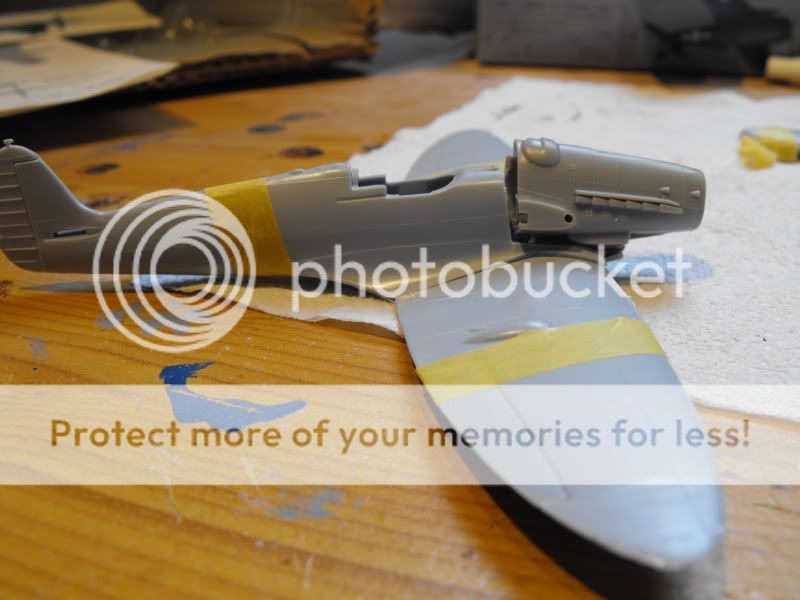
 and this is where i'm up to. I forsee a bit of filler in my future
I have to say i am extremely enjoying this - there is something strangely satisfying about sawing a model up! I'm sure TC2324 knows what i mean
A small amount a of progress today.
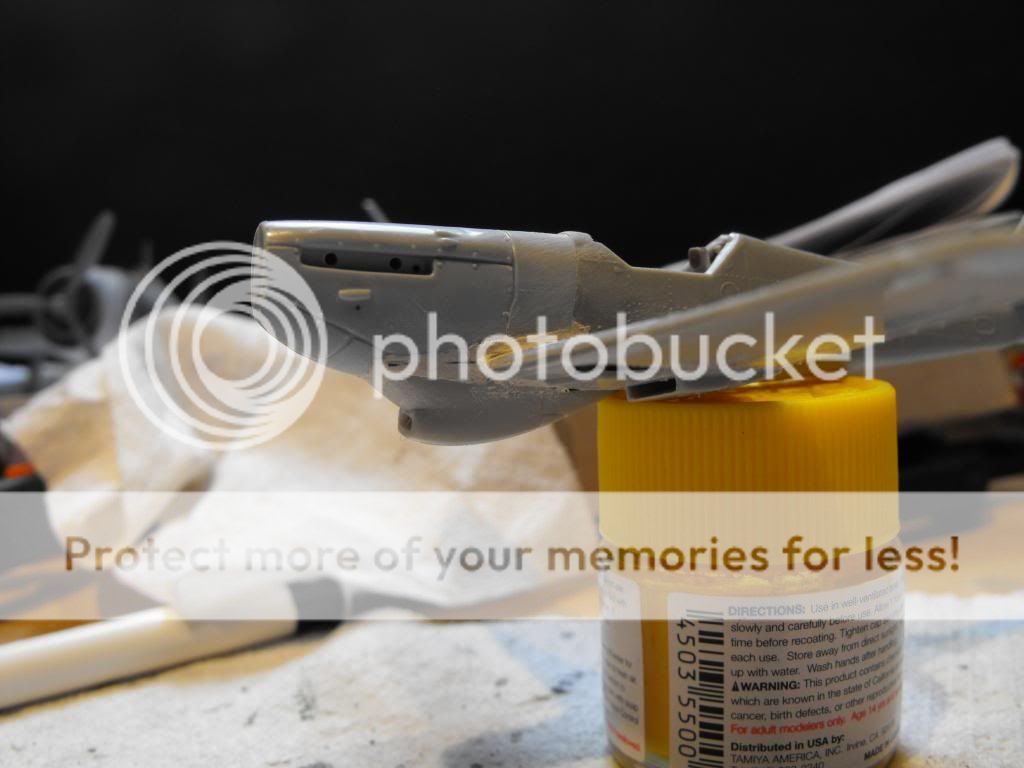
I had to fasten the 109 front end to the spit fuselage and i didn't think to buy some plasticard so i had a rumage aroung the recycling bin and i found this Its a listerine bottle. Nice firm yet flexible plastic, if you look closely you can see i have glued a piece inside the spit
  If anyone knows of any probs glueing this type of plastic now would be a great time to tell me

I have put the two halves together for look at the fit and decided i wasn't happy with verical join of the two edges so i have done it again and left them to dry. I spent the rest of the afternoon doing other jobs, dullcoat on my Japanese Shinjen, the invader stripes on the underside of the typhoon and the horizontal stabilisers on the Messerspit. I also glues the wings together and the U/C. Hopefully i,ll get to do some filling and a coat of primer sometime this week.
So while things were drying i had a thought about what to do the leftovers...... ....Schmidfire anyone.....??
So lets have a few pics of my butchery shall we? First a bit of a comparison
The more eagle eyed among you will notice that the 109 is a Gustav - first one i got my hands on - and not an Emil which has the cleaner shape.
and now after a bit of sawing Hmmn...might need a bit more sawing..........might have slightly overdone it with the sawing....
and this is where i'm up to. I forsee a bit of filler in my future I have to say i am extremely enjoying this - there is something strangely satisfying about sawing a model up! I'm sure TC2324 knows what i mean
A small amount a of progress today.
I had to fasten the 109 front end to the spit fuselage and i didn't think to buy some plasticard so i had a rumage aroung the recycling bin and i found this
Its a listerine bottle. Nice firm yet flexible plastic, if you look closely you can see i have glued a piece inside the spit If anyone knows of any probs glueing this type of plastic now would be a great time to tell me I have put the two halves together for look at the fit and decided i wasn't happy with verical join of the two edges so i have done it again and left them to dry. I spent the rest of the afternoon doing other jobs, dullcoat on my Japanese Shinjen, the invader stripes on the underside of the typhoon and the horizontal stabilisers on the Messerspit. I also glues the wings together and the U/C. Hopefully i,ll get to do some filling and a coat of primer sometime this week.
So while things were drying i had a thought about what to do the leftovers......
....Schmidfire anyone.....?? 
jamesv9820- Moderator
- Posts : 126
Join date : 2012-09-06
Location : South Lincolnshire
Re: Vlad's Schmidfire
![]() Abhorsen Mon 29 Oct 2012, 23:24
Abhorsen Mon 29 Oct 2012, 23:24
Wow mate, this is something that you don't see everyday!
Great start. I'm looking forward to the next update.
Ab
Great start. I'm looking forward to the next update.
Ab
Abhorsen- Posts : 51
Join date : 2012-09-08
Age : 59
Location : Birmingham
Re: Vlad's Schmidfire
![]() Vlad the Inhaler Wed 31 Oct 2012, 13:46
Vlad the Inhaler Wed 31 Oct 2012, 13:46
Thanks for the kind words of encouragement 
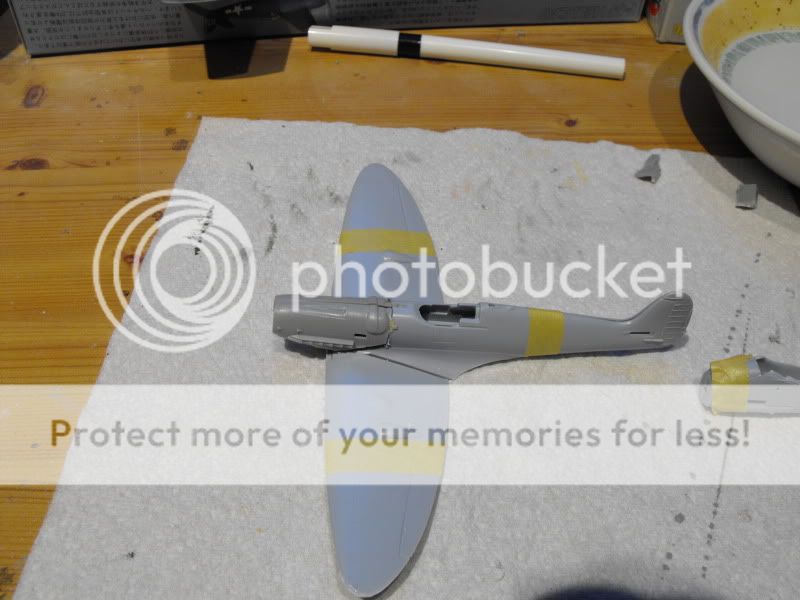
Have got the wings on - i seem to have a huge gap between the top of the wings and the fuselage - were these old airfix kits always like this? Theres is also a bit of filler where the 109's nose joins up too.
I managed to hack off the 109's radiator cowling in trying to get it to fit so have bodged one from the spit leftovers bit out of focus that one - must remember to use the macro setting next time.
 got some undercoat on it - painting realy showed up my sanding so had to have another go at it - its still not perfect but i'm hoping more paint will sort it out

Have useed Tamiya flat white for undercoat, i intend to spray the undersides that lovely bright yellow the Luftwaffe were so fond off so thought a light undercoat might be better. I plan on a couple of shades of grey for the uppers, i have some RAF light sea grey but will have to go out and get a darker grey to go with it
Have got the wings on - i seem to have a huge gap between the top of the wings and the fuselage - were these old airfix kits always like this?
Theres is also a bit of filler where the 109's nose joins up too.I managed to hack off the 109's radiator cowling in trying to get it to fit so have bodged one from the spit leftovers
bit out of focus that one - must remember to use the macro setting next time. got some undercoat on it - painting realy showed up my sanding so had to have another go at it - its still not perfect but i'm hoping more paint will sort it outHave useed Tamiya flat white for undercoat, i intend to spray the undersides that lovely bright yellow the Luftwaffe were so fond off so thought a light undercoat might be better. I plan on a couple of shades of grey for the uppers, i have some RAF light sea grey but will have to go out and get a darker grey to go with it

Vlad the Inhaler- Posts : 69
Join date : 2012-09-09
Location : Lancs
Re: Vlad's Schmidfire
![]() Vlad the Inhaler Mon 05 Nov 2012, 22:49
Vlad the Inhaler Mon 05 Nov 2012, 22:49
Got some yellow on it [/img]https://2img.net/h/i93.photobucket.com/albums/l67/kinghelfer/0014.jpg[/img][/img 
Then masked the yellow up for the darker uppers. I am using Lifecolor RLM 75


It was at this point that my cheap gravity fed airbrush started to play up, so decided to have a go with the (also cheap )dual action airbrush and ballsed up the darker RLM 74 camoflage that i wanted to put over the grey. Its my own fault i should have practised with it first and the end result was too much paint. I decided then that the Lufty boys might have hastily tried to cover up the RAF camo with the grey so made a couple of quick passes and managed to make it look like a hasty repaint.
Its not showing up to well in this pic but believe me - it was a hasty repaint!
So this is where i am up to now

Need to do some touching up with the yellow where the grey ran under the masking tape then a coat of floor polish and some decals. Hope fully the finished pics should show up the cammo showing under the grey better. [img][img]]
Then masked the yellow up for the darker uppers. I am using Lifecolor RLM 75
It was at this point that my cheap gravity fed airbrush started to play up, so decided to have a go with the (also cheap )dual action airbrush and ballsed up the darker RLM 74 camoflage that i wanted to put over the grey. Its my own fault i should have practised with it first and the end result was too much paint.
Its not showing up to well in this pic but believe me - it was a hasty repaint!
So this is where i am up to now
Need to do some touching up with the yellow where the grey ran under the masking tape then a coat of floor polish and some decals. Hope fully the finished pics should show up the cammo showing under the grey better.
Vlad the Inhaler- Posts : 69
Join date : 2012-09-09
Location : Lancs
Re: Vlad's Schmidfire
![]() Vlad the Inhaler Sun 11 Nov 2012, 12:27
Vlad the Inhaler Sun 11 Nov 2012, 12:27
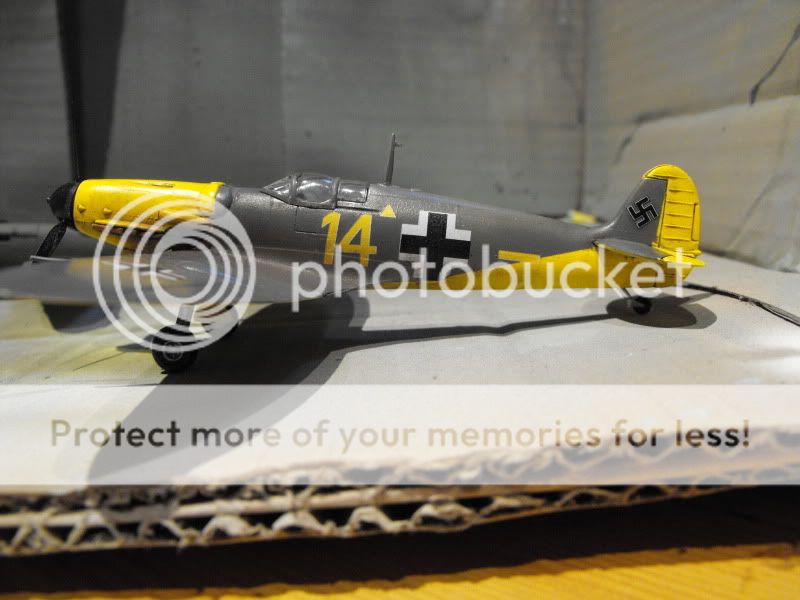
Got some decals on now 
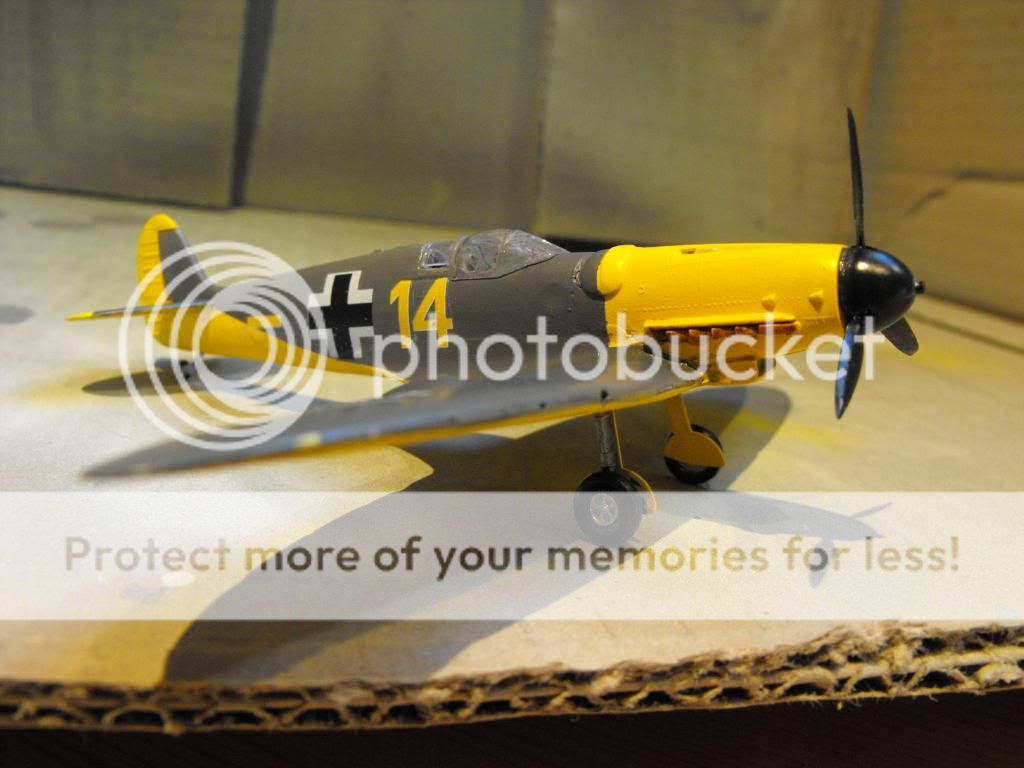


I decided to use the airfix decals that came with the BF 109 and i think they look OK. They were very thin and folded over easily and i'm not happy with the upper wing crosses but I think i can live with them.
Still a few things left to do yet. I need to repaint the canopy frames as they don't have enough paint on and it needs glueing on. The aerial mast needs to go on and i have to decide whether to add the guns.
Then a decent dirt wash and some exhaust staining
Vlad the Inhaler- Posts : 69
Join date : 2012-09-09
Location : Lancs
Re: Vlad's Schmidfire
![]() jamesv9820 Sun 11 Nov 2012, 21:40
jamesv9820 Sun 11 Nov 2012, 21:40
Looking good VLad. Nice to see something different being made. Look forward to seeing I completed.
jamesv9820- Moderator
- Posts : 126
Join date : 2012-09-06
Location : South Lincolnshire
Re: Vlad's Schmidfire
![]() Vlad the Inhaler Tue 13 Nov 2012, 00:04
Vlad the Inhaler Tue 13 Nov 2012, 00:04
Thanks james  I have ordered some of the flory washes as i can't seem to get on with the Lifecolor ones i have - they are too hard to remove if you overdo it
  good job i tried them out on a practice model first. I braved the local shopping centre yesterday and got some pastels from hobbycraft for the exhaust staining but i'm going to apply the wash first when it arrives.
I have since bought the fusion nose modification that started all this and a Tamiya Spit to use it on but i want to use up the leftovers from this one first - so coming soon - The SPITERMESS!!!
I have since bought the fusion nose modification that started all this and a Tamiya Spit to use it on but i want to use up the leftovers from this one first - so coming soon - The SPITERMESS!!!
Vlad the Inhaler- Posts : 69
Join date : 2012-09-09
Location : Lancs
Re: Vlad's Schmidfire
![]() Abhorsen Wed 14 Nov 2012, 06:23
Abhorsen Wed 14 Nov 2012, 06:23
Wow. One minute you're putting paint on, teh next it's practically finished!
Looking good and a really interesting build.
Ab
Looking good and a really interesting build.
Ab
Abhorsen- Posts : 51
Join date : 2012-09-08
Age : 59
Location : Birmingham
Re: Vlad's Schmidfire
![]() Vlad the Inhaler Fri 16 Nov 2012, 23:26
Vlad the Inhaler Fri 16 Nov 2012, 23:26
Time to grubby things up then!

The canopy is removed to repaint and i applied a generous amount of the Flory dark dirt wash

There is also quite a bit of pastel shading along the wing roots thats not showing up well. Note to self: You cant apply pastel shading over a gloss finish like future/floor polish I wondered what was going wrong after a couple of minutes of it sliding off!
Luckily (or not-you decide) the pastels went on better on the undersides. This model is certainly showing up my shortfalls (and its a great learning process i am enjoying) as it sems not enough floor polish was on the undersides then!

I have decided to add the cannons and they are drying off. I think it would look better with a couple of swazzies on the tail, so i will have to have a look for those. I have in mind a repaint of an Fw190 in RAF colours as the Corgi one i have just doesn't sit right on the landing gear, i miight buy one off t'bay and use the swazzies from that if i can find one.
Done some more work on the Spitmess leftovers
I might give it its own build thread ! 
The canopy is removed to repaint and i applied a generous amount of the Flory dark dirt wash
There is also quite a bit of pastel shading along the wing roots thats not showing up well. Note to self: You cant apply pastel shading over a gloss finish like future/floor polish
Luckily (or not-you decide) the pastels went on better on the undersides. This model is certainly showing up my shortfalls (and its a great learning process i am enjoying) as it sems not enough floor polish was on the undersides then!
I have decided to add the cannons and they are drying off. I think it would look better with a couple of swazzies on the tail, so i will have to have a look for those. I have in mind a repaint of an Fw190 in RAF colours as the Corgi one i have just doesn't sit right on the landing gear, i miight buy one off t'bay and use the swazzies from that if i can find one.
Done some more work on the Spitmess leftovers
I might give it its own build thread !
Vlad the Inhaler- Posts : 69
Join date : 2012-09-09
Location : Lancs

tc2324- Posts : 55
Join date : 2012-09-29
Age : 53
Location : London
Re: Vlad's Schmidfire
![]() jamesv9820 Sat 17 Nov 2012, 06:33
jamesv9820 Sat 17 Nov 2012, 06:33
Great process so far.
Just remember that you apply wash on a hi gloss surface as the decals. Then apply the matt varnish and then pastel. The process will not work unless you do this.
Just remember that you apply wash on a hi gloss surface as the decals. Then apply the matt varnish and then pastel. The process will not work unless you do this.
jamesv9820- Moderator
- Posts : 126
Join date : 2012-09-06
Location : South Lincolnshire
Re: Vlad's Schmidfire
![]() scotthldr Sat 17 Nov 2012, 10:51
scotthldr Sat 17 Nov 2012, 10:51
For a first attempt at a "cut and shut" you've done a pretty good job on the mating of the engine block to the fuselage.
Keep up the good work on the 'Spitmess'
Keep up the good work on the 'Spitmess'

scotthldr- Posts : 166
Join date : 2012-09-06
Age : 51
Location : Inverness
Re: Vlad's Schmidfire
![]() Vlad the Inhaler Sun 18 Nov 2012, 03:03
Vlad the Inhaler Sun 18 Nov 2012, 03:03
jamesv9820 wrote:Great process so far.
Just remember that you apply wash on a hi gloss surface as the decals. Then apply the matt varnish and then pastel. The process will not work unless you do this.
Believe it or not quite a bit of the pastel adhered to the so called gloss finish! More of a testament to how much i applied than anything else i think
I have got some paint on the Spitmess - pics to follow - when the camo job is complete i will give it a coat of matt varnish and try again with the pastels
Vlad the Inhaler- Posts : 69
Join date : 2012-09-09
Location : Lancs
Re: Vlad's Schmidfire
![]() Vlad the Inhaler Tue 20 Nov 2012, 23:39
Vlad the Inhaler Tue 20 Nov 2012, 23:39
A few progress pics


Have put a couple of xtradecals swazzies on the tail of the scmitdfire and added the cannon and antenna mast. Just a light coat of matt varnish now and i think that'll be it.
The spitmess has had RAF light grey applied underneath, then RAF blue uppers and post it note cammo masks then the RAF green. Wheels and exhaust stubs next then some pastel weathering etc
Vlad the Inhaler- Posts : 69
Join date : 2012-09-09
Location : Lancs
Re: Vlad's Schmidfire
![]() Vlad the Inhaler Sun 25 Nov 2012, 21:19
Vlad the Inhaler Sun 25 Nov 2012, 21:19
Right then - heres where things are at the moment 
Prop is yellow tacked on, wheels on (second go)after realising that one leg hadn't located in the hole properly and made the model sit very strangelyindeed

Not sure if it shows on this pic but have done some exhaust staining

I covered the big hole left underneath by me ham fistedly hacking off the 109's nose, with the tropical filter option that came with the Spit
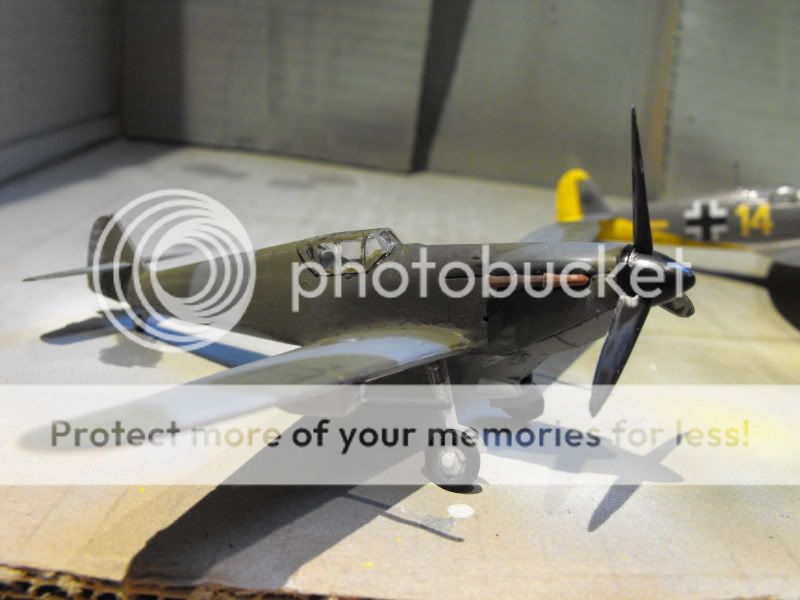
I can't help thinking its given it a bit of a Hurricane look, anyway all over bar the shouting, it now has a coat of floor polish to apply the decals and the panel line wash
Prop is yellow tacked on, wheels on (second go)after realising that one leg hadn't located in the hole properly and made the model sit very strangelyindeed
Not sure if it shows on this pic but have done some exhaust staining
I covered the big hole left underneath by me ham fistedly hacking off the 109's nose,
I can't help thinking its given it a bit of a Hurricane look,
Vlad the Inhaler- Posts : 69
Join date : 2012-09-09
Location : Lancs
Re: Vlad's Schmidfire
![]() mattlaker Tue 27 Nov 2012, 05:38
mattlaker Tue 27 Nov 2012, 05:38
Blimey! It is as though you have been delving into the recesses of my mind! I have a captured Vb to do at some stage with conversion DB605... Nice one!

mattlaker- Posts : 63
Join date : 2012-09-12
Re: Vlad's Schmidfire
![]() Vlad the Inhaler Tue 27 Nov 2012, 08:29
Vlad the Inhaler Tue 27 Nov 2012, 08:29
.mattlaker wrote:Blimey! It is as though you have been delving into the recesses of my mind! I have a captured Vb to do at some stage with conversion DB605... Nice one!
Thanks matt, I also have that conversion bought while doing this, although I have been looking at airfix dogfight doubles of the spit and the ME110 to try it that way. I also have a Stuka/Sturmovick hybrid in mind ;-)
Vlad the Inhaler- Posts : 69
Join date : 2012-09-09
Location : Lancs
Re: Vlad's Schmidfire
![]() mattlaker Tue 27 Nov 2012, 09:06
mattlaker Tue 27 Nov 2012, 09:06
Vlad the Inhaler wrote:.mattlaker wrote:Blimey! It is as though you have been delving into the recesses of my mind! I have a captured Vb to do at some stage with conversion DB605... Nice one!
Thanks matt, I also have that conversion bought while doing this, although I have been looking at airfix dogfight doubles of the spit and the ME110 to try it that way. I also have a Stuka/Sturmovick hybrid in mind ;-)
Now that I want to see!
mattlaker- Posts : 63
Join date : 2012-09-12
Re: Vlad's Schmidfire
![]() Vlad the Inhaler Sat 01 Dec 2012, 00:22
Vlad the Inhaler Sat 01 Dec 2012, 00:22
mattlaker wrote:Vlad the Inhaler wrote:.mattlaker wrote:Blimey! It is as though you have been delving into the recesses of my mind! I have a captured Vb to do at some stage with conversion DB605... Nice one!
Thanks matt, I also have that conversion bought while doing this, although I have been looking at airfix dogfight doubles of the spit and the ME110 to try it that way. I also have a Stuka/Sturmovick hybrid in mind ;-)
Now that I want to see!
Well they are both fairly similar looking, i am giving it some thought as to which bits to swop around - most likely the wings and the U/C

Schmitfire and Spitmess pics now in the gallery, thanks to everyone for their advice and comments
Vlad the Inhaler- Posts : 69
Join date : 2012-09-09
Location : Lancs
Page 1 of 1
Permissions in this forum:
You cannot reply to topics in this forum|
|
|